

Showing posts with label i like to make stuff. Show all posts
Showing posts with label i like to make stuff. Show all posts
Thursday, September 22, 2011


Thursday, September 15, 2011
i like to melt stuff
I'm still working on the Ice Scream Man, the updated properly scaled models have just been completed. I have to clean them up and get them ready to mold. I'll spend more time discussing that later. In the Meantime, here's something else cool.
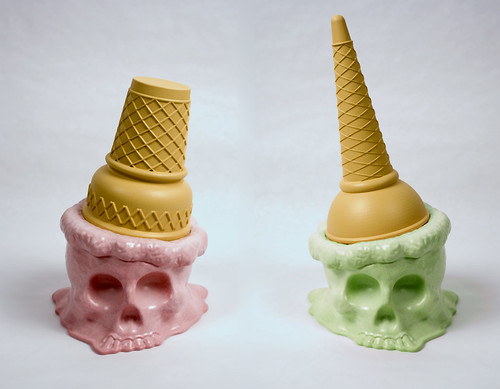
I'm not usually interested in violent imagery but after sculpting the Ice Scream man i have become addicted to melting things. in particular i really like the idea of melting violent, angry, mean things in to gooey, gelatinous loveable puddles. Maybe it's something about taking away their power and making them soft... or maybe it's just fun.
i have a handful of these sculpts in progress right now but here is the first that i actually produced.

still a little violent but what about in some fun colors?

once again i am completely unaware of the size of my own monster hands.
in the case of the cone i guess i underestimated the size of my mitts, this time i overestimated.

Saturday, September 10, 2011
too big!!!
When i was doing the original sculpt for the ice scream skull i wasn't concerned with scale. The sculpting software works with units called vauxals which are similar to a 3-d vector...or infinitely scalable.
when i built the cones i used a different software that is more reliant on actual measurements and made a guess on the overall size after a few rough calculations using my own hand for refrence.
I finally went out and picked up an actual ice cream cone for reference to start proper scaling for a new model. turns out i didn't exactly factor in the right percentages to make up for the fact that i have gorilla hands.


I was about 30% too big, i expected some variance but not quite this much.


I also recieved a very exciting delivery last week. a rotational molder!!!
Now i'll be able to make my little dudes in small production volumes on my own.
I'm a long way from being ready to start production but i'm still pretty excited.
The next step is to make a wax prototype of a true scale ice scream man and experiment to find the most viable way of producing my own molds for use with the rotational molder.
Now i'll be able to make my little dudes in small production volumes on my own.
I'm a long way from being ready to start production but i'm still pretty excited.
The next step is to make a wax prototype of a true scale ice scream man and experiment to find the most viable way of producing my own molds for use with the rotational molder.

here's a video of the molder doing it's spiny thing.
Tuesday, August 30, 2011


Thursday, August 18, 2011


Monday, June 13, 2011
one thing that i can depend on
SOUND SYSTEM!!!
Since the original door cards in the Ami had already been cut for speakers and i like music...
i decided i needed to install an absurd system.


I custom built the "head unit" to run and charge an ipod, there is a standard ipod cable wired to the car battery with rca line outs. the line outs are split to 3 line level control knobs to control my front and rear channels along with a subwoofer. all five speakers are coming from a single 5 channel kenwood amp with crossover control. My front speakers are a set of 5.5" kenwood components with an in-line high pass filter. In the rear is a pair of kenwood 3 way 4x10" speakers and in the trunk is a pioneer 10" subwoofer in an enclosed box with the amp and a capacitor mounted on it. By using this speaker configuration and amp along with three separate line level controls i can simulate having basic audio controls. I can adjust the crossovers to send more highs to the front and all the lows to the sub so i can manipulate the bass and treble controls by adjusting the relative volume of those speakers i get the same fader control to the front and rear channels but what i do not have is a balance adjustment. That's not all that important since the cabin is so narrow. Between these basic controls and the built in eq settings on the ipod i think i am getting very decent audio quality.
I enclosed the line level controls in a plastic box that i designed and built in solidworks and then printed the part on a dimension 3-d printer in black ABS. I adapted the controls to run correct ami6 knobs along with a proper on/off switch and a later model oil pressure warning light to indicate power on.

driver's door

passenger door

view of the rear speaker box and subwoofer

chevron details on the ports.

under the back seat

in the trunk
I am very happy with the project it looks and sounds very clean...it's also very loud.

the new emblem installed
Since the original door cards in the Ami had already been cut for speakers and i like music...
i decided i needed to install an absurd system.
I custom built the "head unit" to run and charge an ipod, there is a standard ipod cable wired to the car battery with rca line outs. the line outs are split to 3 line level control knobs to control my front and rear channels along with a subwoofer. all five speakers are coming from a single 5 channel kenwood amp with crossover control. My front speakers are a set of 5.5" kenwood components with an in-line high pass filter. In the rear is a pair of kenwood 3 way 4x10" speakers and in the trunk is a pioneer 10" subwoofer in an enclosed box with the amp and a capacitor mounted on it. By using this speaker configuration and amp along with three separate line level controls i can simulate having basic audio controls. I can adjust the crossovers to send more highs to the front and all the lows to the sub so i can manipulate the bass and treble controls by adjusting the relative volume of those speakers i get the same fader control to the front and rear channels but what i do not have is a balance adjustment. That's not all that important since the cabin is so narrow. Between these basic controls and the built in eq settings on the ipod i think i am getting very decent audio quality.
I enclosed the line level controls in a plastic box that i designed and built in solidworks and then printed the part on a dimension 3-d printer in black ABS. I adapted the controls to run correct ami6 knobs along with a proper on/off switch and a later model oil pressure warning light to indicate power on.
driver's door
passenger door
view of the rear speaker box and subwoofer
chevron details on the ports.
under the back seat
in the trunk
I am very happy with the project it looks and sounds very clean...it's also very loud.
the new emblem installed
Tuesday, May 24, 2011
making a bunch of stuff
we'll start with making faces
this past weekend Tam and I along with our good friend and neighbor Mr. David Balls hopped in the beetle and drove to asbury park to meet some friends for a day of pinball, booze and beach. At one point Tamara and Ro sat down on a bench to watch a wedding in progress on the beach, while standing around looking like a bunch of creeps the boys and i were asked by a local entrepreneur if we would like to have our portraits taken...only $15 for all of us. We declined, a few minutes later the offer was made again but this time for free because they were a new business and needed the practice. Here is some of what happened next.


If you like their work, you can check out their site here
very nice people, if you ever find yourself drunk in asbury park and in desperate need of portraits, i highly recommend them.
so aside from being a goof i have also been making a lot of stuff for the Ami6.
steering wheel
there is a plastic saddle covering the joint between the steering wheel and the central spoke. I guess after 45 years the plastic has become very brittle and started deteriorating. I decided to take a bunch of measurements and rebuild the part in solidworks before it was too far gone to copy.

then i used a 3-d printer to make a quick prototype to test fit

the fit wasn't perfect so i made a few changes and printed another prototype on a higher resolution printer.

installed

only thing left to do is decide whether it's worth building a mold to cast it in black resin or just paint the prototype and roll with it.
Speakers
in the last photo you might notice a missing door panel and a hole in the vapor barrier.
there are two reasons for this. the door cards were shot, the vinyl was de-laminating and the board was completely warped along with the fact that one of the previous owners of this car had added a single speaker grille to the drivers side door... no speaker, the card was never cut but the vapor barrier and the exterior vinyl were cut?
this is an image from an article in citromania in 2002 that featured my car

you can see that even 9 years ago the door cards were deteriorating heavily.
i started by copying the profile on to new card material and cutting it out.
for the rear i tried to stay original and used proper materials. for the front i knew i needed to do something to hide the hole in the vinyl that was made for the speaker grill. Why not ad actual functioning speakers? I used styrene sheet in the front to support the extra weight of the speakers and avoid warping again.

this is what the back of the vinyl looks like when separated from the board.

i peeled away the felt backing and then used a light grit sandpaper to clean the edges where the felt was heat sealed to the vinyl.

then a new layer of felt is glued in place with spray adhesive

and the vinyl is remounted the same as the felt, i heated the vinyl with a heat gun and stretched it as i laid it down, this combined with the thick layer of felt helped to eliminate wrinkles in the vinyl from years of stretching and warping. The rear panels came out much better than the front, the front seemed to be in worse shape and it was much harder to work out all of the wrinkles.

I built some plastic speaker inserts to house a new set of 5.5" kenwood components.
hit the inserts with a little gris rose paint

hit the trim rings with some hammered steel paint

and the final product

a bad photo of one of the rear cards reinstalled

I'll document the entire interior once the rest of the stereo system is in place.
Old Business
next i tackled something that has been bugging me for a while.
in an earlier post i documented my homebrew hackjob replacement of a broken coil mount.
i finally got around to making a proper mold and casting some clean parts.

New Business
there is a sticker on the back of my car instead of a proper emblem.

that just won't do...
so i fired up my tiny milling machine and threw in a chunk of aluminum
and this is what it spit out

and after a little polishing

and the skull chevrons are a little something else i am working on

this past weekend Tam and I along with our good friend and neighbor Mr. David Balls hopped in the beetle and drove to asbury park to meet some friends for a day of pinball, booze and beach. At one point Tamara and Ro sat down on a bench to watch a wedding in progress on the beach, while standing around looking like a bunch of creeps the boys and i were asked by a local entrepreneur if we would like to have our portraits taken...only $15 for all of us. We declined, a few minutes later the offer was made again but this time for free because they were a new business and needed the practice. Here is some of what happened next.
If you like their work, you can check out their site here
very nice people, if you ever find yourself drunk in asbury park and in desperate need of portraits, i highly recommend them.
so aside from being a goof i have also been making a lot of stuff for the Ami6.
steering wheel
there is a plastic saddle covering the joint between the steering wheel and the central spoke. I guess after 45 years the plastic has become very brittle and started deteriorating. I decided to take a bunch of measurements and rebuild the part in solidworks before it was too far gone to copy.
then i used a 3-d printer to make a quick prototype to test fit
the fit wasn't perfect so i made a few changes and printed another prototype on a higher resolution printer.
installed
only thing left to do is decide whether it's worth building a mold to cast it in black resin or just paint the prototype and roll with it.
Speakers
in the last photo you might notice a missing door panel and a hole in the vapor barrier.
there are two reasons for this. the door cards were shot, the vinyl was de-laminating and the board was completely warped along with the fact that one of the previous owners of this car had added a single speaker grille to the drivers side door... no speaker, the card was never cut but the vapor barrier and the exterior vinyl were cut?
this is an image from an article in citromania in 2002 that featured my car
you can see that even 9 years ago the door cards were deteriorating heavily.
i started by copying the profile on to new card material and cutting it out.
for the rear i tried to stay original and used proper materials. for the front i knew i needed to do something to hide the hole in the vinyl that was made for the speaker grill. Why not ad actual functioning speakers? I used styrene sheet in the front to support the extra weight of the speakers and avoid warping again.
this is what the back of the vinyl looks like when separated from the board.
i peeled away the felt backing and then used a light grit sandpaper to clean the edges where the felt was heat sealed to the vinyl.
then a new layer of felt is glued in place with spray adhesive
and the vinyl is remounted the same as the felt, i heated the vinyl with a heat gun and stretched it as i laid it down, this combined with the thick layer of felt helped to eliminate wrinkles in the vinyl from years of stretching and warping. The rear panels came out much better than the front, the front seemed to be in worse shape and it was much harder to work out all of the wrinkles.
I built some plastic speaker inserts to house a new set of 5.5" kenwood components.
hit the inserts with a little gris rose paint
hit the trim rings with some hammered steel paint
and the final product
a bad photo of one of the rear cards reinstalled
I'll document the entire interior once the rest of the stereo system is in place.
Old Business
next i tackled something that has been bugging me for a while.
in an earlier post i documented my homebrew hackjob replacement of a broken coil mount.
i finally got around to making a proper mold and casting some clean parts.
New Business
there is a sticker on the back of my car instead of a proper emblem.
that just won't do...
so i fired up my tiny milling machine and threw in a chunk of aluminum
and this is what it spit out
and after a little polishing
and the skull chevrons are a little something else i am working on
Monday, February 28, 2011


Subscribe to:
Posts (Atom)